Water-Mitigation Guide: How to Produce Better Field Notes to Create Rock-Solid Estimates
Restoration
5 min read

Share

Silvia Corvi
Community Manager
When you’re running a restoration business, you already know the truth most adjusters won’t say out loud: they’re not rejecting your estimates because the content “doesn’t follow the rules.” They’re rejecting each estimate because they don’t understand the story. A water mitigation estimate that’s technically compliant but poorly explained is easy to cut. A clear, documented, room-by-room narrative is much harder to argue against. That’s the big shift this guide will help you make.
The Real Difference Between “Compliant” and “Believable”
You’ve probably been told to write “carrier-compliant” estimates — meaning you’ve checked the right boxes, used the right codes, and followed the right formatting. But compliance alone doesn’t make an estimate defensible.
A compliant estimate:
Uses the correct line items
Follows carrier formatting
Includes basic photo documentation and notes
A believable estimate:
Explains why each action was necessary
Connects the scope to the conditions you found
Shows the progression of the job like a walkthrough
Includes proper documentation that supports every decision
Adjusters don’t approve estimates because they’re impressed with your code accuracy. They approve them because they can clearly understand what happened, what you did, and why it was required.
Why Story-Based Estimates Get Approved Faster
Think about how you explain a job to a homeowner. You don’t start with line items. You start with the story:
What you saw when you arrived
What was wet
How far the water traveled
What you needed to remove
What equipment you placed
How the drying progressed
That same narrative structure works beautifully for adjusters. When your estimate reads like a walkthrough, it reduces the mental load on the reviewer. They don’t have to guess why you placed eight air movers or why you removed baseboards in one room but not another - the story tells them.
A story-based estimate also shows that your scope is grounded in real conditions, not guesswork. That alone eliminates a huge percentage of objections.
How to Structure a Clear, Defensible Water Mitigation Estimate
Below, we are providing a structure you can use on every job. It’s broken out into sections to keep your estimate readable, logical, and easy for an adjuster to follow.
1. Initial Visit / Inspection
This section sets the stage. It should answer:
What caused the loss?
What areas were affected?
What was the moisture condition on arrival?
What immediate actions were required for safety or stabilization?
This is where your field notes matter most. A few sentences of clear context can prevent a lot of back-and-forth emails later.
2. Room-by-Room Breakdown
This is the heart of a defensible estimate. Each room should include:
What was wet
How far moisture traveled
What materials were affected
What actions you took and why
When you break down the job room by room, you’re essentially walking the adjuster through the property. It’s the closest thing to having them on-site with you.
3. Equipment Placement
Adjusters challenge equipment more than anything else. You can reduce that dramatically by documenting:
The types of units, and quantities for each
Why those quantities were required
How long those units ran
How the equipment supported drying goals
When you tie equipment to conditions, not just to a formula, it becomes much harder to dispute.
4. Drying Progress
This section should show:
Moisture readings over time
Changes in affected materials
When drying goals were met
This is where your documentation proves the equipment was necessary for the duration billed.
5. Demolition (If Applicable)
Demo is often challenged unless you clearly explain:
What materials were removed
Why removal was required (e.g., contamination, delamination, trapped moisture)
How removal supported drying or prevented secondary damage
Photos are essential here. A single image of saturated drywall or cupped flooring can justify thousands of dollars’ worth of demo work.
6. Cleanup and Final Steps
Wrap up with information about:
Debris removal
Antimicrobial application
Final cleaning
Post-mitigation condition
This section shows the job was completed responsibly and thoroughly.
Claims Documentation: The Backbone of a Defensible Estimate
Even the best-written estimate falls apart without supporting documentation. Adjusters aren’t just looking for line items — they’re looking for proof. Here’s what strengthens your credibility:
1. Photos
Not just “before and after.” You need:
Moisture meter photos
Material damage photos
Equipment placement photos
Demo progress photos
Photos eliminate ambiguity. They also reduce the adjuster’s ability to reinterpret the situation.
2. Notes
Short, clear notes are better than long, vague ones. Think:
“Baseboards removed due to trapped moisture behind drywall.”
“Air movers increased from 6 to 8 due to extended moisture migration into hallway.”
Notes should explain decisions, not restate line items.
3. Room Data
Dimensions, materials, and moisture readings help justify:
Equipment quantities
Drying duration
Demolition scope
When your room data matches your line items, your estimate becomes much harder to challenge.
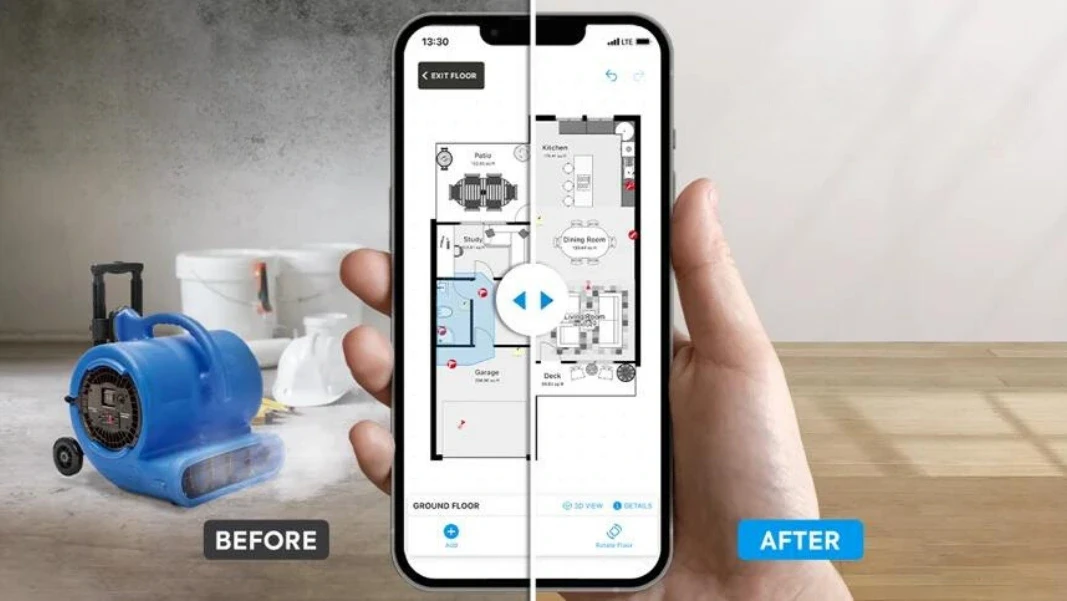
How Digital Scoping Eliminates the Most Common Objections
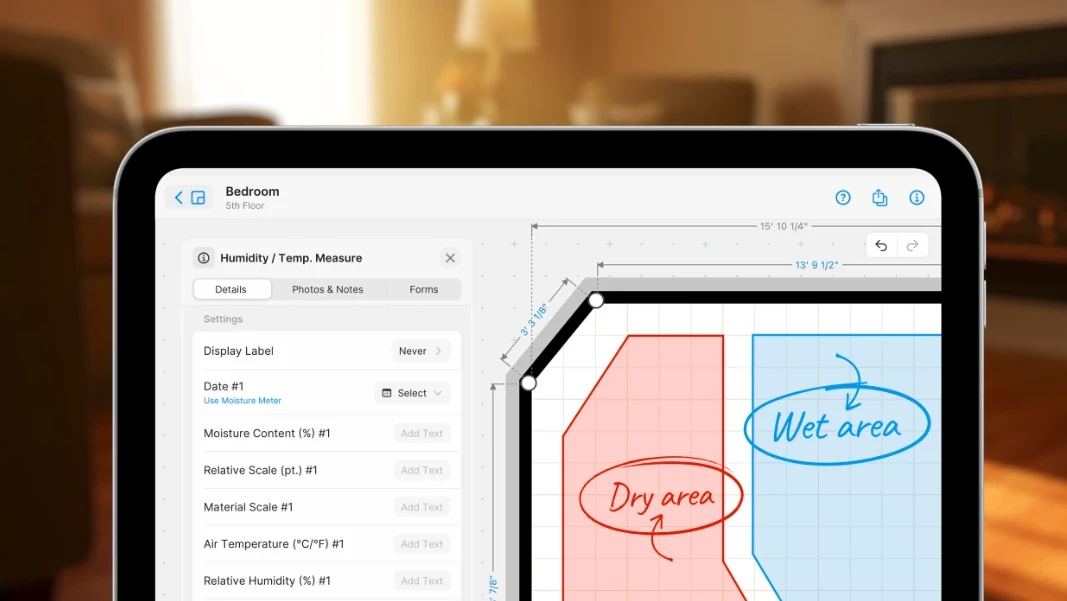
Let’s talk about digital scoping in practical terms — specifically, how using the right software helps you avoid the kinds of mistakes that lead to estimate reductions. For example, look at what you can do with magicplan restoration software:
Complete Room-by-Room Scoping
Digital scoping with a tool such as magicplan forces you to think in a narrative structure:
What happened in this room?
What did we do?
What does it cost?
This naturally produces the story-based estimate adjusters prefer.
Use Built-In Line-Item Libraries
When you can quickly pull accurate WTR, CLN, and other codes with magicplan, you avoid:
Wrong line items
Missing line items
Mispriced tasks
This reduces the “technical” objections that slow approvals.

Combine Photos + Notes in One Place
When your visual documentation and notes live inside the same magicplan scope, they provide helpful context:
Nothing gets lost
Nothing gets forgotten
Everything is tied to the correct room
This is one of the biggest reasons digital scoping leads to fewer disputes.
Rely on Consistent Templates
If all of your technicians and estimators use the same software and the same documentation structure:
Your estimates look uniform
Your documentation is predictable
Carriers know what to expect
Consistency builds trust, and trust leads to faster approvals.
Export ESX files seamlessly to Xactimate Estimate Software
Your magicplan scope exports cleanly into Xactimate software to ensure that:
Line items match
Quantities match
Room data matches
This eliminates the “translation errors” that often trigger adjuster questions.
Wrap-Up
If you want your estimates to get approved without endless revisions, you need more than compliance — you need clarity. A defensible, software-driven estimate tells the story of the job, room by room, supported by photos, notes, and data. When you combine that story with a digital scoping workflow that keeps everything organized and Xactimate-ready, you eliminate most of the objections before they ever come up.
Remember: You’re not just writing estimates. You’re building a narrative that proves your work was necessary, reasonable, and professional. And when you do that consistently, approvals come faster, disputes shrink, and you increase your cash flow.
CHECK OUT THIS RELATED ARTICLE:
How to Effectively Assess and Document Water Damage (Step-by-Step)


