

How to Use magicplan Forms & Fields to Close More Jobs in Less Time
Restoration
5 min read

Share
Watch the video on YouTube - Every job’s different. One day it’s a clean water leak under a sink, next day you’re cutting 2 feet up on a cat 3 loss. Either way, you need to collect the right info—claim numbers, damage notes, readings, photos, signatures. Not later. Right there, on site. In this article, I’ll walk through how to set up and use forms & fields in magicplan — the kind of stuff that helps you document water losses cleanly, stay organized across crews, and avoid headaches when it’s time to get paid.
Why Forms and Fields Matter
Each project is unique. From residential renovations to complex restoration work, professionals often need to gather detailed, project-specific information—claim numbers, damage descriptions, readings from equipment, or approval signatures.
magicplan’s custom forms and fields empower teams to:
🙂 Standardize data collection across projects.
🙂 Streamline communication between field technicians and office teams.
🙂 High-quality Reports = Ensure consistency for clients and insurers.
By tailoring forms to your company’s workflow, you can transform data collection from a tedious task into an efficient, error-free process.
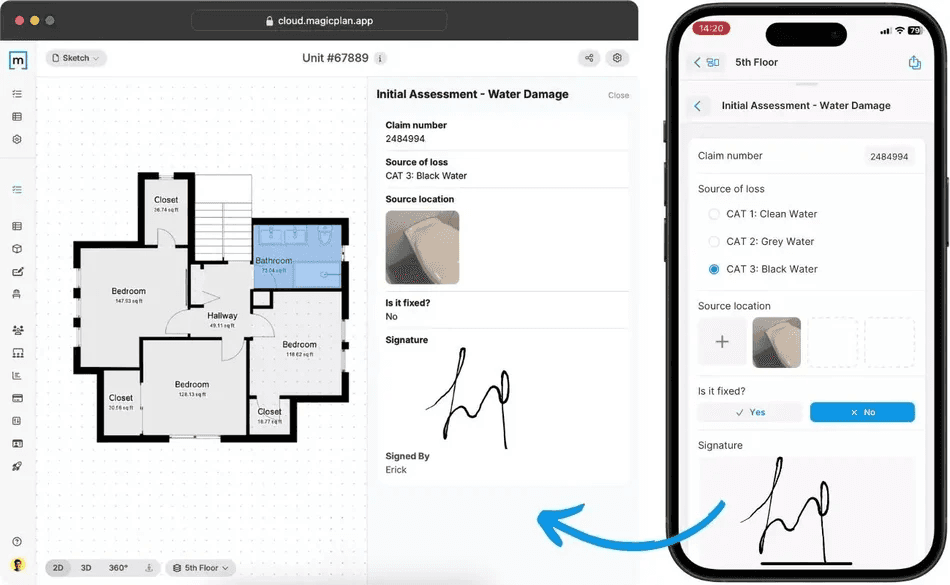
Step 1: Filling Out a Form in magicplan
Let’s start on the magicplan app, where field technicians typically work. Once your floor plan is ready, open your project and look for the Forms section. You can attach forms at different levels:
📌 Project level → for information that applies to the entire job.

📌 Floor level → for data relevant to specific floors.
For example, imagine you’re documenting water damage. You can fill in a form containing:
✏️Claim number and date of loss
✏️Property type and accessibility
✏️Source of damage (e.g., plumbing leak)
✏️Photos or videos of affected areas
✏️Professional assessments and signatures
magicplan allows you to add logical conditions too—for instance, when you answer “Yes” to prior water damage, an additional text field (logic) appears to describe the incident in detail. This conditional logic keeps forms dynamic and context-aware, reducing clutter while prompting for relevant information only.
Once you are happy, you can generate a detailed report PDF directly from the app. Each form can be placed on its own page, complete with photos, notes, and digital signatures, giving your report a professional and organized appearance.
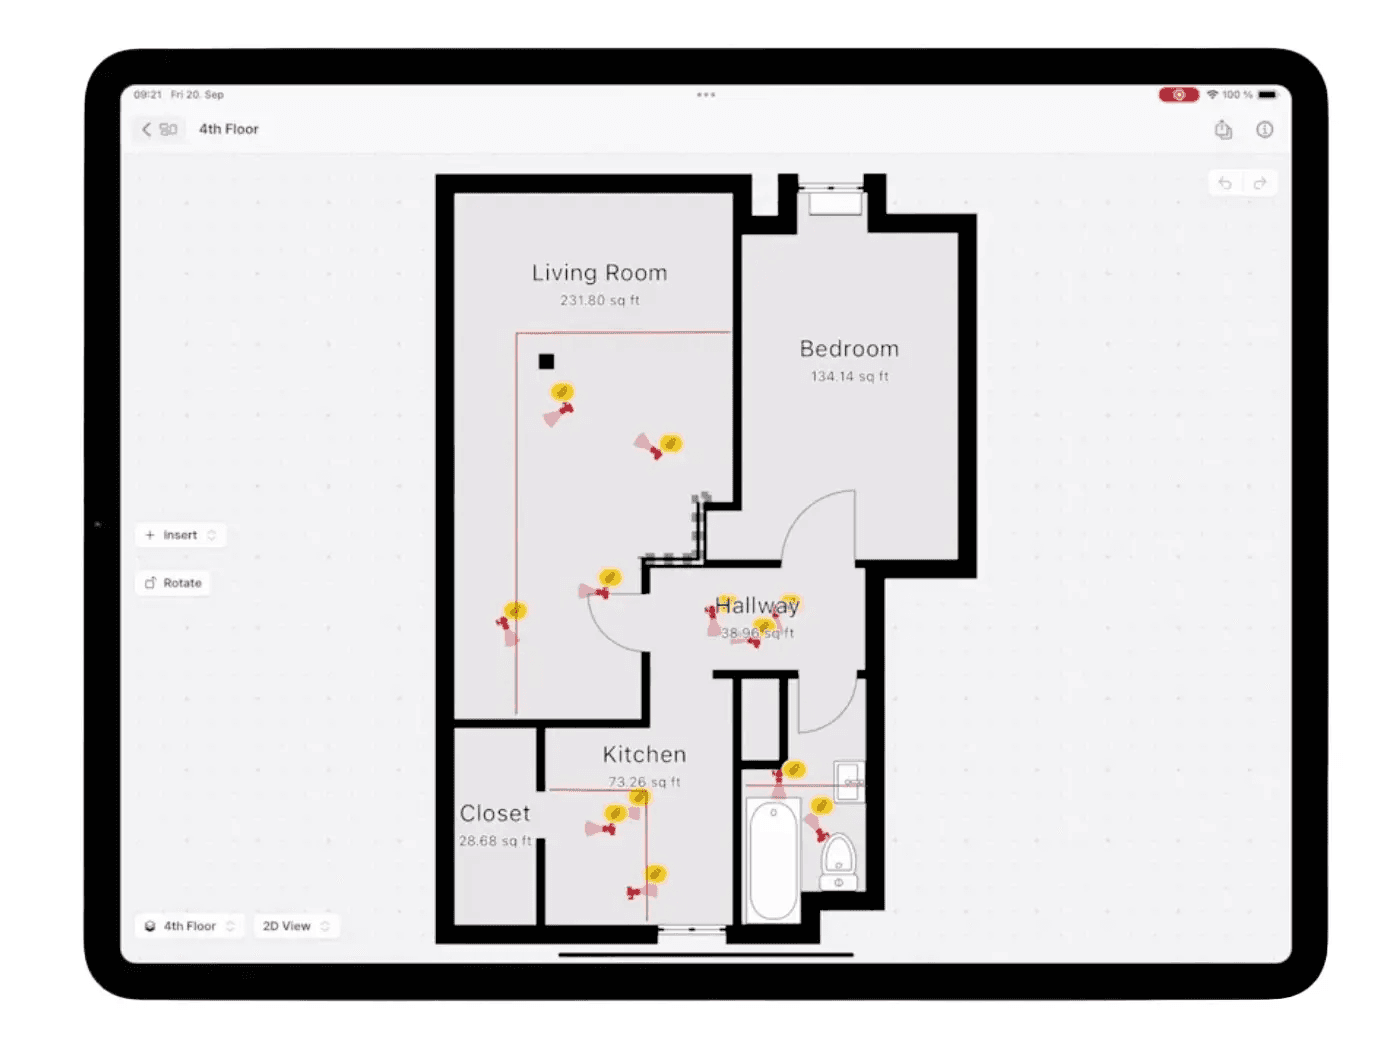
Step 2: Working with Fields
Forms are great for structured project data, but sometimes you need to capture quick details directly linked to objects—like a dehumidifier or air scrubber.
✅ That’s where custom fields come in.
Select the object on your plan, open its information panel, and you’ll find fields ready for input. You can include important info like:
- Temperature (°F)
- Relative humidity (%)
- Running hours
- Measurement date and time
Because fields are tied to specific objects, they’re perfect for equipment monitoring or inventory tracking. When exporting your report, all field data appears neatly alongside other project details.
Step 3: How to Create Forms & Fields
For office administrators or project managers, setup happens in the magicplan Cloud. You start creating a form, or a field, so that your on-site team can fill it in from their app, on their mobile device.
To create a new form:
1. Go to Forms in the Cloud dashboard.
2. Select the level it applies to—Project, Floor, or Room.
3. Add sections (e.g., Claim Information, Damage Overview).
4. Insert questions with various input types (text, number, date/time, photo, yes/no, dropdown list, etc.).
5. Use logic rules to reveal or hide questions dynamically and all needed details.
Once finished, publish your form to make it available in the magicplan app. You can also unpublish forms when not needed, keeping your workspace clean and relevant.
For fields, the process is similar:
1. Navigate to Fields in the Cloud.
2. Choose the object or category (e.g., “Restoration” → “Air Scrubber”).
3. Add fields such as date/time, temperature, or photo attachments.
Publish your field so it syncs instantly with your mobile workspace.
Not sure about what to include in your Professional Water Damage Document? We’ve got you covered, take a look at how you can create water damage reports like a pro.
Learn more: How to create consistent documentation for every job
Step 4: Managing Workspaces and Permissions
Remember that forms and fields are linked to specific workspaces. If you’re part of multiple teams or departments, you’ll only see the forms created within your active workspace. This keeps projects secure, organized, and contextually relevant.
You can, of course, create multiple forms and fields across different workspaces—there’s no limit!
Pro Tips for Getting the Most Out of magicplan Forms & Fields
➡️ Keep forms concise: Focus on critical data points that add value to your reports.
➡️ Use logic smartly: Show only the questions that matter based on previous answers.
➡️ Leverage photos and markups: Visual documentation speaks volumes in reports.
➡️ Standardize naming conventions: Make it easy for your team to identify and reuse templates.
➡️ Test before rollout: Fill in your form on a demo project to ensure it behaves as expected.
Bringing It All Together
magicplan’s forms and fields aren’t just about capturing data—they’re about empowering teams to work smarter. Whether you’re on-site documenting damage or in the office designing workflows, these tools close the gap between field operations and project management.
With a few clicks, you can create structured, professional documentation that not only looks great but also supports better decision-making.
Are you looking for advanced setup tips? Email us at helpdesk@magicplan.app or take a look at the magicplan community — plenty of pros in there who’ve been through it.


