The Definitive Restoration Workflow Guide: How to Make Every Job Flow Seamlessly
Restauration
5 min read

Share

Benjamin Brown
Director of Sales Acquisition
If you look across your recent projects, you’ll probably notice that the biggest friction rarely comes from the work itself; it comes from chasing information, rebuilding files, mishandling handoffs, and smoothing over miscommunications. But when you design your workflow so that data is captured once in the field, stays connected across the full mitigation/reconstruction process, and is instantly usable in your estimating and back-office systems, every job starts to feel more predictable and less chaotic.
The key to making that happen is to use a digital app that allows you to centralize and manage information seamlessly through every stage of each project. Here is a helpful, 12-stage guide that explains exactly how that’s done:
1. Complete the initial intake
Every job starts with a single call or message from a homeowner, property manager, or program partner describing what happened and how urgent it is. During this intake stage, you capture essential details (location, contact info, cause of loss, access, safety concerns, insurance information) and create a job record that becomes the anchor for everything that follows. Using a digital app, such as magicplan, to open the project during intake means your field team sees the same information you collected at your office — instead of relying on handwritten notes or scattered emails or text message.
2. Prepare for the first job-site visit
Once the job is created, you decide who goes, what equipment to bring, and how quickly your team needs to respond based on severity and risk. This stage includes checking coverage requirements, identifying checklists that are needed for a walkthrough, and reviewing any special instructions that might affect how you respond. When all dispatch details live in the same digital project you opened at intake, both the field and office stay aligned on expectations, arrival windows, and the initial game plan.
3. Perform the initial site inspection and safety check
On arrival, your first responsibility is safety: identify structural hazards, electrical issues, contaminants, or environmental risks before anyone starts work. Record any identified safety hazards in your digital app.
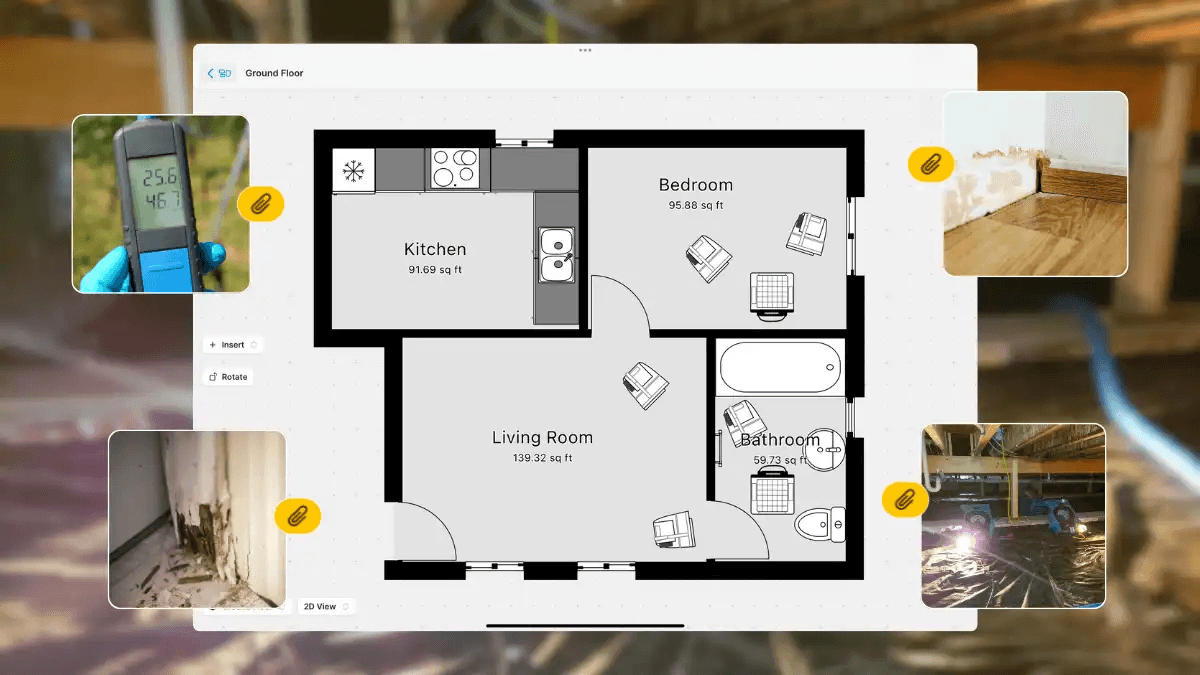
4. Document the loss with sketches, photos, and notes
Next, perform a high-level inspection to understand the source, category, and extent of damage at the job site. This is where you must create detailed visual documentation to record your findings. And you can save all of that information in one, centralized place with a connected app like magicplan restoration software: room sketches, room labels, photos, instrument readings, and notations are captured, connected and stored together, so you only document everything once and then reuse that data later for planning, estimating and reporting.
5. Define the mitigation plan and start work
With the loss documented, you decide on the mitigation strategy: what needs extraction, what items must be removed, which materials can be saved, and what containment or safety measures are required. You outline specific details, such as demolition steps, equipment types and counts, and necessary PPE, while communicating the plan to both the homeowner and your team. When your plan is built directly on top of the proper documentation within your app, your crew can see exactly what to do, where to do it, and why, reducing confusion and rework.
6. Set up equipment, monitor progress, and update documentation
During active mitigation, your team gets to work. For instance, when addressing water damage, they will likely need to extract water, set up equipment, install containment barriers. Someone will also need to return to the job site to monitor and document progress. Each visit should include updated moisture readings, photo evidence of progress, and notes about any changes or surprises on site. Recording those readings, photos and notes in the same project documentation you created on day one keeps your drying log organized, and it also makes it easy to generate reports that justify your mitigation decisions and duration.
👉 Here's how you take Moisture Readings like a PRO
7. Build and refine scopes for mitigation and reconstruction
As mitigation stabilizes the property, you must refine scopes for both the work you’ve done (or are finishing) and the repairs needed to return the structure to its original condition. This includes room-by-room line items, material types, and quantities that will drive your estimate in whichever estimating platform you use. Because your scopes are built on structured field data — i.e., accurate measurements, detailed sketches, labeled rooms, and linked photo documentation — your estimates will be more defensible and will require fewer revisions.
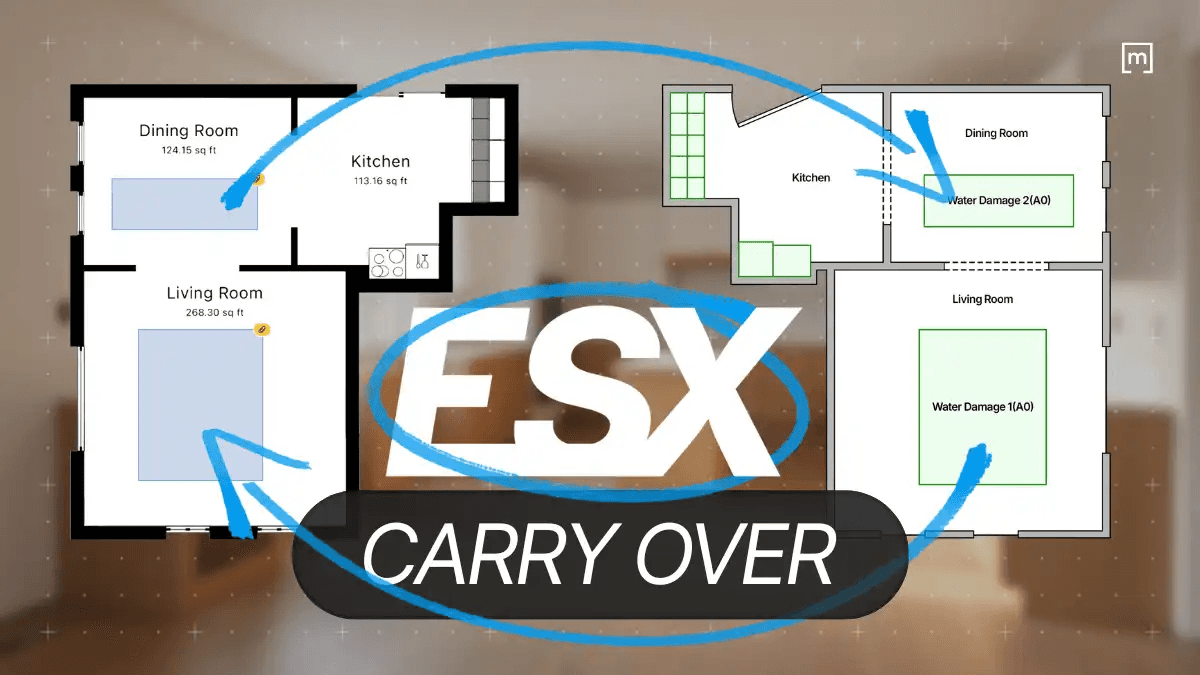
8. Create estimates and submit for approval
Once the entire scope is solid, you turn it into a formal estimate. The goal is to tell a clear story of what was damaged, what was done, and what must be rebuilt, supported by consistent documentation. Using a tool like magicplan restoration management software as the source of truth for claims documentation means you can pull quantities, room details, and annotated photos directly into Cotality or Xactimate software without manually retyping or re-measuring. That capability speeds approvals and reduces errors.
LEARN MORE: How to use the Xactimate® Integration with magicplan
9. Plan reconstruction and coordinate trades
After approvals, you transition from mitigation to reconstruction, which involves scheduling work, coordinating trades, ordering materials, and managing selections with the homeowner. At this stage, accurate documentation of what was removed, where walls were opened, and what conditions were discovered drives efficient planning and fewer surprises. When your reconstruction plan references the same digital project documentation used for mitigation, your team and subcontractors can clearly see the intended scope for each room.
10. Execute reconstruction and manage changes
As the rebuild progresses, you manage daily work, address change orders, and communicate with both the homeowner and the payer about schedule and scope adjustments. Unexpected issues behind walls or code upgrades often require updates to your plan, your documentation, and sometimes your estimate. Keeping all changes documented in the same connected project within your app maintains continuity and makes it easier to justify any supplements or revisions later.
11. Conduct quality assurance and capture final documentation
Near completion, you walk the job with the homeowner, identify punch-list items, and confirm that the work matches both the approved scope and the customer’s expectations. You also capture “after” photos, confirm that equipment is removed, and verify that any code-related upgrades or special requests have been handled. When you place those final photos and notes in the same digital record that contains your original loss documentation, you create a clean before-and-after story that is simple to share and defend.
12. Obtain sign-offs, export reports, and finalize billing
The final stage is administrative but critical: gathering signatures, exporting documentation, and issuing invoices for all completed work. You may need carrier-ready reports, TPA-specific formats, or internal summaries for your accounting system, and they all depend on accurate, structured data from the entire job. A connected app like magicplan helps here by turning the documentation you created from day one — sketches, photos, readings and notes — into organized reports ready for easy exporting. This means you are not frantically rebuilding paperwork at the end of the project.
Wrap-Up
The restoration workflow is really a story about momentum: every job starts in chaos, and your success comes down to how smoothly you move from the first phone call to your final invoice. When your information flows with you — instead of getting stuck in clipboards, emails, text messages, and disconnected tools — every stage becomes faster and more predictable.
TIP: Be sure to hang on to this guide as a handy resource for future projects!


